Softwares, Hacks, PTC, Tips And Tricks = !! Details..........................................................

Labels


Opera 9.6: Speed Dial


Here's another dose of the Opera Web browser for you! If you didn't already know, the people over at Opera recently released the new Opera 9.6 and it's now available for download here. Opera claims to be the only browser that comes with everything you need to be productive, safe and speedy while online. Let’s take a quick look at the Speed Dial feature available in the new version. Here we go!

Speed Dial is a new method of quickly browsing to your favorite Web sites. When you hit the New Tab button, instead of the usual blank page, you'll see a 3 x 3 grid. The grid takes up the full screen and it's laid out in the fashion of a telephone dial with numbers from 1 to 9. Each number can be populated with a different URL, selected from either your existing favorites or entered manually. Now, I know you might be thinking that nine speed dials is not nearly enough. Well, lucky for you, there's an easy way to increase the number of speed dials. Let's check it out, shall we?!


1.) Open Opera and go to Help, About Opera. That will open a page that shows the version information, as well as, other useful information about Opera. Check the Paths section and copy the path for the Opera Directory.


2.) Close Opera and paste the path into the Run dialogue box. Hit OK and you'll then see the Opera profile directory.

3.) You’ll see the “speeddial.ini” file in the folder. Open the file in Notepad and add the following lines to the end of the file:

[Size]

Rows=4

Columns=5

In the above code, 4 and 5 are just examples. You can replace them with your desired numbers.


4.) Save the file and open Opera again. Now, you’ll be able to see more speed dials in Opera!


Enjoy it, my friends!

Orkut Softwares

Here in this post, I'm going to tell you about three softwares which can be very usefull while doing orkuting.

1. Orkut Cute: It is an interesting software
which can be used for:

* Sending a same scrap to all your friends including hyperlinks.
* Starting a same topic in all your communities.
* Get Notifications like "New Profile View" or "New Scrap" etc.

2. Orkut Scrapboy: This is awesome software generally known as Orkut Messenger which can be used for sending and receiving instant scraps from your friends without a web browser. It gives you more Convenience and speed while scrapping.

3. Orkut Toolbar: This toolbar makes navigation in orkut much easier by providing some user friendly buttons in menus. It also provides features like Pop up Blocker, email alerting, Online Radio etc.

All these softwares are easily available on many internet websites which can be downloaded free of cost. You can search these softwares on your favourite search engine.

Optimize Computer Performance


Some people think that optimizing the computer's performance is a difficult task. But, it is actually a simple and easy task. Just take the following simple steps to optimize the computer's performance. Use all these tips together to get good results:

  1. Check registry files: Registry files control the software systems and programs on a computer. They can become damaged when you uninstall a program. Generally, uninstalling one program lead to a problem with another program that shared similar registry files. Therefore, use some good registry scanning software to determine if everything is working fine. There are lot of good registry scanners available in the market. Some of them are free wares. You can use any of these. (See my other posts on Registry Scanners: Abexo Registry Cleaner and Registry Cleaner Software).

  2. Remove unwanted icons from desktop: The easiest ways to optimize the computer’s performance is to cleanup the things on the desktop. The icons which you never use slow down a computer. Deleting these icons will free up some memory and speed up the computer. If you mistakenly install any application / software on the desktop, then be very carefull.

  3. Upgrade the Computer memory: Buying a memory may be costly, but it's very simple and easy way to speed up your computer. It will also fix memory errors if any. Before buying the memory / RAM for your computer, look for shops, make a survey and find a best value deal.

  4. Use Program uninstallers: Many times, when programs are removed, they leave behind some traces. So, use a program uninstaller to uninstall or remove installed software. Choose any good uninstaller software like Advanced Uninstaller PRO or Total Uninstall etc.

  5. Delete every unwanted program from the task bar. They utilize memory and slowdown the computer. You can do this by following simple steps:
  • Click on Start > Run. Enter MsCONFIG. Press enter key. Click on Start UP. Here you will find a list of start up programs.
  • Uncheck programs like real players, Office startup, Quicken Reminder, etc.
  • Do NOT uncheck systray, Explorer and Virus check or scheduler programs.


Recover your Outlook Password


Sometimes, you might lost or forget passwords to your personal folders and you lost the important data. In such situations, it is very important to recover the password.

You will be happy to know that OutlookPassword is software which can help you to recover password-protected Outlook personal. It's recovery engine is capable of recovering any password instantly. But, please note that there is no way to decrypt the original password.

Basically, OutlookPassword will generate a "fake" password which is accepted by Outlook as valid one. It's absolutely impossible to recover your original password if it is of more than 4 characters.

The best thing is the latest version supports all Outlook versions. You may download it at the following URL:

http://lastbit.com/outlook/default.asp


Print Pictures only from Web sites


When you browse Internet, you might want to print a picture from any of the website of your interest. There is a simple way for that. Just follow the below steps:

  • Right click on image
  • Chooses the option Print Picture

If you want to edit the picture before printing, then first save this picture file on your computer. Edit the picture using any image editing software. Now, you can print the edited image.

Abexo Registry Cleaner

It is a useful Registry Cleaner utility that can insure your computer / laptop runs as efficiently as possible.

A problem in the Registry may become an issue on many computers. As you use your computer; install and uninstall softwares, a lot of invalid entries go into Windows registry
which can cause system complications and slow down your computer significantly.

Unfortunately, there is no cleanup ability within the windows registry to remove these kinds of bad or outdated entries. But, with the help of Abexo Registry Cleaner you can remove the obsolete registry entries and fixes the errors.

In this registry cleaner, there is a registry defragmenter which is also called as compressor. It removes the empty spaces after a registry cleanup and reduces Windows registry size. Registry de-fragmentation increases the speed and overall performance of your computer.

If you want to know the power of Abexo Registry Cleaner, I would recommend you to clean your windows registry with some other companies’ registry cleaner. Then, clean the registry
of with Abexo Registry Cleaner. Now, see how many more registry errors Abexo Registry Cleaner will find.

Also, there is a 30-day unconditional money-back guarantee on Abexo Registry Cleaner. You may download it from the below URL:

http://www.abexo.com/free-registry-cleaner.html


Copy a path to the Clipboard


Many times, you may want to obtain a copy of the path of a file or folder in the hard disc of your computer. You may need this very frequntly in the organization or office.

Most of us do this by following below steps:

  • Launching the Windows Explorer
  • Traverse the directory to the file / fiolder
  • Select the contents of the address bar
  • Copy the path and paste it in Notepad
  • Finally, type the filename itself.

But, you will be glad to know that with Windows Vista, you no longer have to perform these steps to get the path to a file. It is very simple and easy. Just hold down the "Shift" key, right-click on the file or folder, and select the new command titled "Copy as Path". Now, the path of file / folder will be copied to the Clipboard. You can paste it anywhere with "CTRL + V".


Trace a Gmail Email Account


Copyright © 2008 Ed Opperman

When Gmail first threw its hat into the email ring a few years ago, its service was open only to those who had received an invitation. Now, however, it's free and has exploded into one of the most popular email services available - thanks to Google's trusted brand name, its simplicity, the huge amount of storage space available for absolutely free, extra features (such as POP3 access), embedded web and video chat, and so many more! Is it any question, then, that millions of people are already using Gmail - even though it's a relative newcomer on the email scene?

And though Gmail's spam filters are among the best available, there is a chance that, at some point, you'll receive unwanted email - and it might even be from a Gmail address. In such an instance, your best bet is to use Gmail's own reverse email search; it's easier for Gmail, after all, to search its own records than to have an outside source looking in. See what you're able to discover about the sender. (Gmail is especially attractive to those wishing to remain very much anonymous, because the headers in any given piece of mail are stripped of any and all IP information. Thus, the stalker or hacker believes himself or herself to be secure.)

Even if you don't have much luck, or any at all, you are far from out of options. In fact, now would be a good time to check out one of the many free independent reverse email search engines available online. When using these sites, the key is to remain tenacious - because it may take a good while before you produce results. Giving up is the last thing that you want to do; after all, even if the reverse email search engine you are using isn't having any success at all, bear in mind that there are those services which, for whatever reason (and there exist a few possibilities), have more success than others!

If you are still having little to no success, or if the email received was of a particular harmful or malicious nature, you might want to consider contacting a third party for some needed extra help. I am referring to professional investigators who specialize in online matters, since they have tools at their disposal not necessarily available to you. Every step taken online leaves a 'footprint' - data that can be tracked and which will inevitably lead to the person who has been taking the steps all along. This is true even if the person in question is using dial-up or a handful of proxies; while these factors could slow down a search, they are never able to stop a search in its tracks altogether!

Private investigators often have access to what is known as the "deep web" - information not available through conventional means such as, say, a simple Google search. So always remember that the only way to ensure your subject gets away is for you to run out of steam and simply give up. Otherwise, you should inevitably be able to find the information that you are looking for! Best of luck!

------------------------

Ed Opperman is president of Opperman Investigations Inc He is considered an expert on the reverse email search and online investigations Visit http://www.emailrevealer.com to end your fears.


Opera 9.6: Speed Dial

Here's another dose of the Opera Web browser for you! If you didn't already know, the people over at Opera recently released the new Opera 9.6 and it's now available for download here. Opera claims to be the only browser that comes with everything you need to be productive, safe and speedy while online. Let’s take a quick look at the Speed Dial feature available in the new version. Here we go!

Speed Dial is a new method of quickly browsing to your favorite Web sites. When you hit the New Tab button, instead of the usual blank page, you'll see a 3 x 3 grid. The grid takes up the full screen and it's laid out in the fashion of a telephone dial with numbers from 1 to 9. Each number can be populated with a different URL, selected from either your existing favorites or entered manually. Now, I know you might be thinking that nine speed dials is not nearly enough. Well, lucky for you, there's an easy way to increase the number of speed dials. Let's check it out, shall we?!


1.) Open Opera and go to Help, About Opera. That will open a page that shows the version information, as well as, other useful information about Opera. Check the Paths section and copy the path for the Opera Directory.


2.) Close Opera and paste the path into the Run dialogue box. Hit OK and you'll then see the Opera profile directory.

3.) You’ll see the “speeddial.ini” file in the folder. Open the file in Notepad and add the following lines to the end of the file:

[Size]

Rows=4

Columns=5

In the above code, 4 and 5 are just examples. You can replace them with your desired numbers.


4.) Save the file and open Opera again. Now, you’ll be able to see more speed dials in Opera!


Enjoy it, my friends!


Folder Lock

Are you tired of your friends, co-workers or children messing with your important computer files? Well, it doesn't have to be like that anymore! If you start using Folder Lock, you'll see just how easy it can be to safeguard your sensitive files against unwanted access. Folder Lock works with Windows Vista, XP, NT, ME and 98 and it's so easy to use. Let's check it out, shall we?!

Folder Lock is a fast data encryption and password protection program for Windows. It can simultaneously encrypt, lock and password protect your files, folders, drives, USB drives and even your CD/DVD ROM drives.


Folder Lock creates encrypted storage spots called "lockers." You can keep as many of your private files and folders as you want in your locker and password protect them with just a single click. You can transfer, secure and back up your lockers as well. The lockers are portable, meaning you can keep them on a flash drive, on a CD or DVD or you can transfer them via e-mail. Plus, the lockers are incapable of being deleted as long as Folder Lock is installed on your computer.

You can treat the lockers just as you would in the physical world. For example, each single user can create multiple lockers with different passwords. With Folder Lock, you can choose to either encrypt using 256-bit AES on-the-fly encryption or you can lock your files, folders and drives anywhere on your computer. Each locker can contain your encrypted files, as well as, your personal list of locked items.

Furthermore, Folder Lock's options, such as hack attempt monitoring, stealth mode, data shredding, history cleaning and auto protection can enhance data security beyond anything ever achieved before. In addition, a locker's Delete, Move and Rename options are password protected to prevent data loss.

If you're interested, you can download Folder Lock for yourself right here. Enjoy!


Website:-Troovi

Would you like to share your photos online in high quality? Well, now you can with Troovi!

This Web site is so easy to use! Just click on the Choose Photos button to get started. That will open your computer's Open menu, so go ahead and select the photo you’d like upload. Free users can upload 15 images at a time, so don’t be shy!

Once you’ve selected all the photos you want to upload, click on the Upload button. Once they're uploaded to the site, a window will come up. The window contains the link you need to see the photos you’ve uploaded. It's very important for you to copy and paste that somewhere to save it. I like to paste the URL into Notepad. The window that popped up also gives you the option to send out your photo collection via e-mail.

When you’re finished filling out the e-mail form to share your photos with all your friends and family, just click on the Finished button. E-mailing it to yourself is another great way of saving your unique link. (Make sure you check your spam folder as well, because that’s where my e-mail ended up).

After you’ve uploaded the initial batch, you can add more photos by clicking on the Add More Photos button. It works the same way as it did the first time you did it. I hope you have fun with Troovi!

http://troovi.com/


Website:-Study Stack

Welcome to Study Stack! This is my favorite study Web site, because it integrates studying not only by traditional means (think flashcards), but it includes studying by playing games. I love to recommend this site to my friends in class who are getting ready to take the GRE (Graduate Record Examination).

Start by selecting the subject matter you’d like to study from the list provided. You’ll then be taken to a much larger list that has study stacks for the specific topic you chose. Choose a study stack from the list and you'll be taken to its page. There you can choose the method you'd like to study. Your options are: Notes, Flashcards, Study Stack, Study Table, Matching, Hangman, Crossword, Word Search, Unscramble, Type In, Bug Match, Export, Print, Edit, E-mail and Hmm.

Three options I really want to point out to you are Export, E-mail and Print. Export allows you to download the date to your cell phone, PDA, computer or even your iPod. The E-mail option allows you to send the address of the study stack to your friends via e-mail. Print allows you to print out flashcards in several different styles to use offline.

You can also add your own study materials if you can’t find what you need to study. To add your own, scroll down to the bottom of the list for the subject you want to study and then click on the Create Your Own link.

You’ll need to register to add your own material. It's really easy if you have a Facebook account, because you can use that to log in. If you don’t, that's okay too! Just register for Study Stack. To do so, fill out the registration form with a username, e-mail address, password and agree to the terms and conditions. It’s that simple!

Once you’re logged in, you can also create a study stack by clicking on the Create a New Stack link under your Stacks tab. You’ll need to name your stack, type in a description for it and decide whether you want to let other users edit it or whether you want it to auto-generate for the games.

Now, click on the Data tab. That's where you'll be able to insert the data you want to study. Type in the questions, then the answers and make sure you click on the Save Changes button when you’re done updating the data information.

Before you know it, you’ll have your study stack completed and you'll be ready to start using it. Pretty neat, huh?!

http://www.studystack.com/


Website:-Where's My Cell Phone?

I'm notorious for losing my cell phone around my house and in my car. But with this Web site, I no longer have any trouble finding my cell phone!

All you have to do is put in your cell phone number and click on the Find It button. The service will call your cell phone for free and let it ring so that you can find it. It only takes a few seconds!

You can ring your phone once every five minutes until you find it. They don’t keep any of the numbers they dial, so you don’t have to worry about them using your information.

This is a very handy tool! There's even a gadget you can add to your Google homepage (if you use Google) that allows you to use it right from there.

I’ve bookmarked this site and if you lose your cell phone the way I do, you’ll want to do the same!

http://www.wheresmycellphone.com/


Website:-My Live Signature

I’m really excited about sharing this Web site with you! My mom sent it to me after she used it to create a signature she could use for her work e-mails. I recommend starting with the Quick Tour.

The Quick Tour will not only walk you through the whole process, but it will also explain all the different ways you can make your signature. You'll want to get a static signature, because they’re free! (Only the static ones created from the wizard or with the draw tool are free).

To get started making your signature, click on Start Now. You’ll then need to choose whether you want to use the wizard or the draw tool. I recommend using the wizard, because it was a lot more fun to select a font that matches my hand writing than to draw a deformed version of my signature with the mouse.

To use the wizard, click on the Create Signature button underneath the text that says “Create a new signature using our wizard.” That will lead you to a page where you’ll be presented with three options: wizard, draw or upload. You'll want to select the wizard, which is the first option.

After selecting the wizard tool, you’ll be asked to type in the name or nickname you’d like to use for your signature. I put in Amanda @ WorldStart.com, which is how I sign my e-mails. In the next step, you’ll select which font you want to use. There are around 120 different fonts you can choose from and they may take a minute or tow to load. Click on the bullet of the font you want to use and then click on the Next button at the bottom of the page.

The next step is to select the size you want your signature to be. I like mine rather small, so I selected size 2. There are ten different sizes to pick from, so you’ll have plenty of options. Click on the Next button to continue. Here you'll select the color of the font you want to use for your signature. There are ten different colors to choose from. Next, you can set the slope of your signature. There are ten different slopes to choose from as well. You’re finally finished!

Take the code they give you for your signature (signature ID) and copy it. Then paste it on the Start Now page under the Download a Signature heading. The other thing you can do with the signature ID is paste it under the Generate a Code section. That will give you a choice between an HTML code and a BB code. If you want to use it on a forum, choose the BB code. If you want to use it on a Web page, choose the HTML code.

Now, you have a personalized signature all your very own. Yes!

http://www.mylivesignature.com/


Website:Thanks-O-Meter

I truly believe that kindness triggers more kindness. An excellent example of that happened to me recently. My roommate and I were on our way to an appointment with her doctor. We got in the car and were all set to go when we remembered we left the cookies we made for her dad in the house. So, she tries to back into the drive way, but misses it and hits a snowdrift in our yard. We try to pull back out, but we were stuck! Then one of our neighbors came out of his house to walk his dogs and sees that we're in trouble. He takes his dogs back in the house, grabs his shovel and dashes across the street to help us.

Thanks to his kindness, we were able to get to the doctor’s office on time and we arrived in enough time to help an elderly woman get past the icy walkway. We helped her into the office and she was so grateful that someone would help her, she couldn’t stop smiling. Once she was settled in to wait on the doctor, I noticed she was seated across from a little girl with the flu who just looked miserable. The woman we helped struck up a conversation with her, got her to smile and took her mind off being sick.

With all the bad news in the world these days, it was so refreshing to find this Web site. Thanks-O-Meter celebrates those every day events of kindness, charity and anything that deserves a thank you!

It works by you selecting a thank you, choosing how it made you feel and then sharing your story. For my story, I chose "For Being Great Neighbors" and it made me feel lucky and grateful. Then I selected to share my story. It was hard to keep it within the 500 character limit, but I managed to do it.

Don’t have anything to share right now? Well, that’s no problem! You can enjoy all the stories everyone else has submitted on the site. Just click on the Stories tab at the top of the page. Then select an emotion and it will give you a listing of stories you can read that were tagged with that particular emotion.

A program for ending programs safely and effectively


Today I have free download for you all that has saved me a ton of headache. Have you ever read the fine print when you install a program? Almost all of them tell you to close all running programs before continuing with the installation. This seems simple enough until you actually try to do it. Stopping all running programs on a computer is a huge pain in the you know what. Well, that is where end-it-all comes in. This little hand program only serves one purpose; to end programs! Just launch end-it-all and closing all of your programs are just one click away!


This is the menu bar for end-it-all. The single "x" and the skull and cross bones are for closing or killing a single application respectively. The multi "x" and skull and crossbones will close all programs or kill all programs respectively.

"What is the difference between close and kill " you ask?. Closing a program will attempt to close it by asking nicely for it to stop. This works sometimes, but not others. Killing a program will stop a program dead in its tracks. This works all the time, but is a bit more harsh. You should try the close option first.

I think this program is great for what it does. If you want to give it a try, you can download it here. Just go to the page and click the "download set-up only file" link. Its even compatible with Vista!

How to sort rows in Excel 2007

How to sort rows in Excel 2007

By default, you can sort columns easy in Excel 2007 (and other Excel versions). But what to do when you need to sort rows? Of course, you can do that manually but Excel 2007 can do that for you, too.

Sellect rows you want to sort.
In Ribbon, sellect Data card.
In "Sort & Filter" chose "Sort".
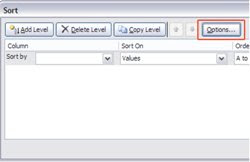
In Sort window, click Options button.
In "Orientation" chose "Sort left to right" radio button.
Click OK.
In Sort window with drop-down menus you can chose order and way you would like to sort rows.
Click OK.

What is my IP address

You would like to know what is your IP address when you are connected on the Internet? You can get your answer on several different ways. You can go to whatismyipaddress.com and you'll see your IP and where are you on Google map. But if you need more information you can go to Start - Run, than type CMD and press ENTER. There, just type
"ipconfig/all" (without quotes) and press ENTER. You will get more than IP address, you'll see full profile of your connection like on image bellow:

How to make folder private

folder private
If you are not the only user on your computer, you can make some forlders private and only when you log in with your username you can see them. This option is only available for folders included in your user profile. Folders in your user profile include My Documents and its subfolders, Desktop, Start Menu, Cookies, and Favorites. If you do not make these folders private, they are available to everyone who uses your computer.
Open My Computer. Then, double-click the drive where Windows is installed (usually it's drive (C:), unless you have more than one drive on your computer). Double-click Documents and Settings folder. Open your user folder. Right-click folder in your user profile you want make private, and then click Properties. On the Sharing tab, select the Make this folder private so that only I have access to it check box. When you make a folder private, all of its subfolders are private as well. For example, when you make My Documents private, you also make My Music and My Pictures private. When you share a folder, you also share all of its subfolders unless you make them private.

Dont type http

While typing the website URL address in Internet Explorer of Mozilla Firefox url bar, there is no need to bother with typing the http://. All you need to do is start typing the WWW. Both Firefox and Explorer will add http:// in automatically when you start typing. For some websites you don't even type WWW, just what's after www. That other trick depends on website, although, so on some sites it won't work. But first tip for http will fork for all websites.

How to email a group of contacts in Gmail

Another interesting and useful Gmail option is possibility to email a group of contacts . And that you can do on this way. Go to "Contacts". Than click on Group you would like to e-mail. On "Select" click "All". Or select just contacts you want to email. When contacts are selected, on right side just click "Email". Gmail will automatically redirect you to new message with field "To" filled. That's if you would like to everyone who receive this message see who else you mailed message. If you don't want that, copy addresses from "To" field to "Bcc" field and after that, leave just one address in "To". Than you can write Subject and message body and send it.

How to email a group of contacts  in Gmail

Gmail - How to add contact in group

You need to add some email adress (contact) in your Gmail group (eg friends). And that contact is only in suggested contacts and you don't see Group menu on right side in Gmail. You need first add that suggested contact to My contacts or into Most contacted. Go to Suggested contacts, check particular check-box infront that e-mail adress and click Move to my contacts on right. Now, go to My contacts, check box by adress, click Groups menu right, and Add to group you want.

Gmail group contact

How to merge rar files with Winrar

How to merge rar files with Winrar?

You have several rar files (file1.rar, file2.rar, file3.rar) you downloaded from internet and now you have to merge them into one file. First all that files must be in one folder. Do right click on file1.rar and go to Extract here. Chose folder what you like and extract. If you get pop up while extracting, like this:

rar password

that means you need password to merge files. Go to that page where you downloaded part rar files and you will see password there.

How To Copy CD

To make a copy of a CD, you'll need a master to copy,
a blank disk, a CD-RW drive, and the proper software.

Most computers now include either a CD-RW or DVD-RW
drive. If not, you can purchase the appropriate drive reasonably cheaply.
Check out online prices or nip in to your local computer store for advice.

If you have a DVD-RW drive, you'll be able to copy
both CDs and DVDs. The rate of copying will vary,
with 4X being the slowest and up to 48X being the
fastest at the moment. If your drive supports 48X, you can duplicate
a CD in a matter of minutes.

Once you have the CD-RW or DVD-RW drive and some
blank CD-R media, all you need is the software to
duplicate. There is a huge range of CD buring software from freeware
to commercially available packages such as Nero. You will be spoiled for choice!

Once you have everything set up, just run the
software and create your disk. You can copy many
types of media, including pictures, video, audio,
and even data from your computer to a CD. Depending on what
you want to copy, all need to do is select it from the
software menu then sit back and let it rip.

Change the default custom dictionary in MS Word

Word has simplified the way you work with custom dictionaries.

You don't need to use Notepad to make changes

In previous versions of Word, you opened a separate text editor, such as Notepad, to work with custom dictionary content.

In Word, you don't have to leave your document environment to make changes to your custom dictionaries. Instead, you use a simple, streamlined dialog box that's easily available by selecting the dictionary in the Custom Dictionaries dialog box, and then clicking Modify.

Dictionaries are clearly organized by language

When you create or install a custom dictionary, you can associate a particular language with it so that Word only uses the dictionary when you check spelling of text in that language.

The dictionaries are then grouped by language in the Custom Dictionaries dialog box, making it easy to locate and switch between them.

You can quickly change the default custom dictionary

If you use one custom dictionary more than others, you can quickly make it the default dictionary directly from within the Custom Dictionaries dialog box. The default custom dictionary is the one that words are added to when you select Add to Dictionary during a spelling check.

Make business cards in MS Word

You can quickly create attractive and professional business cards in two ways using Word:

* Use ready-made business card templates from the Microsoft Office Online Templates Web site.

* Create your own business cards from scratch with the Envelopes and Labels dialog box.

Choose the right paper

You can either have a professional printer print your business cards or you can purchase paper and print them yourself at home. For home printing, Avery® is a popular do-it-yourself brand and provides standard business card paper: 2" X 3.5" cards on 8 1/2" X 11" heavyweight cardstock sheets. The tiny perforations in the sheets allow you to separate your business cards easily with professional results.

If you choose ready-made business cards from the the Microsoft Office Online Templates Web site, look for the Avery product number listed with the template. If you use the Envelope and Label feature in Word, the dialog box shows the product numbers for the Avery business card size you need.

label options

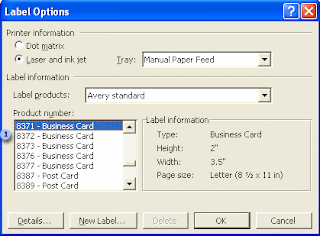
Choose the business card paper you want from the Product number list. The Label information area to the right shows a description of each paper or label type you select.

Work with a ready-made template

If you start with a template to make your business cards, all you need to do is change the default text to match your company and contact information. In just a few minutes, you'll be ready to print your cards.

Work from scratch using the Envelopes and Labels dialog box

Using the Envelopes and Labels dialog box, you can either print directly or insert your business cards in a new document for later use.
To make and print your business cards

1. On the Tools menu, point to Letters and Mailings and then click Envelopes and Labels.
2. Click the Labels tab, and in the Address box, enter the company and contact information you want to display on your business card.
3. Right-click to show the shortcut menu, and then choose the formatting and alignment options you want.
4. Under Print, leave the default selected, Full page of the same label. This allows you to print multiple business cards on a perforated, heavyweight cardstock sheet by Avery.
5. Click Options, and under Printer information, choose the printer you want.
6. Under Label products, leave the default selected, Avery Standard.
7. Under Product number, choose the business card number you want, and then click OK. If the product number you want is not listed, one of the listed labels still may be the size paper you want.
8. In the Envelopes and Labels dialog box, do one of the following:

* To print one or more business cards, insert your sheet of Avery heavyweight cardstock into the printer and then click Print.

* To save your business card for later use, click New Document, and then click Save on the Standard toolbar.


envelopes and labels

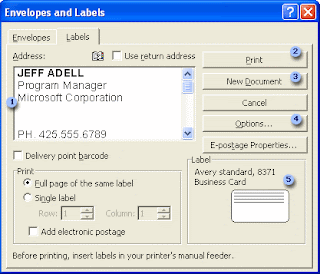
1 Address box: Enter your contact information. Using the shortcut menu, you can format and align your text.

2 Print button: Click to print your business cards directly from this dialog box.

3 New Document button: Click to insert your business card information into a Word document for later use.

4 Options button: Click to choose the type and size of Avery paper for your business cards.

5 Label area: View the paper type and size based on your selection in the Label Options dialog box.

wildcard character

To start, let's define a couple of terms:

* A wildcard character is a keyboard character that you can use to represent one or many characters. For example, the asterisk (*) typically represents one or more characters, and the question mark (?) typically represents a single character.
* In our case, a regular expression is a combination of literal and wildcard characters that you use to find and replace patterns of text. The literal text characters indicate text that must exist in the target string of text. The wildcard characters indicate the text that can vary in the target string.

That may seem a bit abstract, but you've seen (and most likely used) wildcard characters and regular expressions since you first began computing. For example, the Open dialog box (on the File menu, click the Open command) uses the asterisk wildcard character extensively:

Wildcard characters in the Open dialog box

And, if you ever used the MS-DOS operating system, you probably used a command and a simple regular expression to copy files:

copy *.doc a:

That command uses the asterisk wildcard character and the .doc literal text string to copy a set of Word documents to hard disk drive A. If you look around a bit, you'll see that Microsoft Windows® and the Microsoft Office applications use wildcard characters everywhere.

The steps in this section explain how to use a regular expression that transposes names. Keep in mind that you always use the Find and Replace dialog box to run your regular expressions. Also, remember that if an expression doesn't work as expected, you can always press CTRL+Z to undo your changes, and then try another expression.
To transpose names

1. Start Word and open a new, blank document.
2. Copy this table and paste it into the document.

Josh Barnhill
Doris Hartwig
Tamara Johnston
Daniel Shimshoni
3. Press CTRL+F to open the Find and Replace dialog box.
4. If you don't see the Use wildcards check box, click More, and then select the check box. If you don't select the check box, Word treats the wildcard characters as text.
5. Click the Replace tab, and then enter the following characters in the Find what box. Make sure you include the space between the two sets of parentheses: (<*>) (<*>)
6. In the Replace with box, enter the following characters. Make sure you include the space between the comma and the second slash: \2, \1
7. Select the table, and then click Replace All. Word transposes the names and separates them with a comma, like so:

Barnhill, Josh
Hartwig, Doris
Johnston, Tamara
Shimshoni, Daniel

At this point, you may wonder what to do if some or all of your names contain middle initials.

Microsoft Office Groove 2007

Groove 2007 is a collaboration software program that brings teams together to work on project activities and share information — anywhere, anytime, with anyone. Teams use Microsoft Office Groove 2007 for a broad range of projects, from simple document collaboration to custom solutions integrated with business processes. Working in Groove 2007 workspaces saves time, increases productivity, and strengthens the quality of deliverables.

This product guide provides an overview of Groove 2007 and highlights some of its key new features. It also offers a real-world scenario that illustrates how Groove 2007 helps a distributed project team collaborate more effectively. Download this document to learn more about Groove 2007.

Microsoft Office Groove 2007 Requirement

Computer and processor - 500 megahertz (MHz) processor or higher
Memory - 256 megabyte (MB) RAM or higher
Hard disk - 1 gigabyte (GB); a portion of this disk space will be freed after installation if the original download package is removed from the hard drive.
Drive - CD-ROM or DVD drive
Display - 1024x768 or higher resolution monitor
Operating system - Microsoft Windows XP with Service Pack (SP) 2, Windows Server 2003 with SP1, or later operating system.
Integration with Windows SharePoint Services requires connectivity to Microsoft Office SharePoint Server 2007 or Windows SharePoint Services 3.0. Built-in InfoPath Forms Tool requires Microsoft Office InfoPath 2007. Groove/messenger integration requires Windows Messenger 5.1 or later or Communicator 1.0 or later. Includes a 1 year subscription to the Groove relay service.
Browser - Internet Explorer 6.0 or later, 32 bit browser only. Internet access (fees may apply).

Whats new in 2007 Microsoft Office system suites

New suites, servers, and services in the 2007 Microsoft Office release will deliver additional functionality and new solutions. With updated packaging options, you will have more flexibility than ever before to adopt the specific technologies and solutions that best meet your business and personal needs.
1 Volume License customers who purchase Office Professional Plus 2007 or Office Enterprise 2007 may download Office Outlook 2007 with Business Contact Manager by visiting the volume licensing services Web site or may request the assistance of their reseller.
2 Microsoft Office Accounting Express 2007 is available in the U.S. only.
3 Microsoft Office Communicator 2007 is scheduled for release in the second quarter of 2007. International versions of Microsoft Office Communicator 2007 are scheduled for release in the second half of 2007.
4 ECM from Microsoft easily extends content management to every information worker in an organization through integration with familiar tools like the Microsoft Office system. Learn More.
5 The 2007 Microsoft Office System release provides core form creation and completion capabilities, as well as Forms services to facilitate the distribution and management of your electronic forms. Learn More.
6 The 2007 Microsoft Office system release includes sophisticated IRM capabilities and policy controls designed to help organizations safeguard digital information from unauthorized use

Creating keyboard shortcuts to open programs

You can create keyboard shortcuts to open programs, which can often be simpler than opening programs using your mouse or other pointing device. Before completing these steps, verify that a shortcut was created for the program to which you want to assign a keyboard shortcut. If no shortcut was created, browse to the folder that contains the program, right-click the program file, and then click Create Shortcut to create one.


1. Locate the shortcut to the program for which you want to create a keyboard shortcut.

2. Right-click the shortcut, and then click Properties.

3. In the Shortcut Properties dialog box, click the Shortcut tab, and then click the Shortcut key box.

4. Press the key on your keyboard that you want to use in combination with CTRL+ALT (keyboard shortcuts automatically start with CTRL+ALT), and then click OK.

You can now use this keyboard shortcut to open the program when you're using the desktop. The shortcut will also work while using some programs, though it might not work with some programs that have their own keyboard shortcuts.
Notes

* The Shortcut key box will display None until you select the key, and then the box will display Ctrl+Alt followed by the key you selected.
* You cannot use the ESC, ENTER, TAB, SPACEBAR, PRINT SCREEN, SHIFT, or BACKSPACE keys to create a keyboard shortcut.

Using your computer keyboard

Whether you're writing a letter or entering numerical data, your keyboard is the main way to enter information into your computer. But did you know you can also use your keyboard to control your computer? Learning just a few simple keyboard commands (instructions to your computer) can help you work more efficiently. This article covers the basics of keyboard operation and gets you started with keyboard commands.
How the keys are organized

The keys on your keyboard can be divided into several groups based on function:


Typing (alphanumeric) keys. These keys include the same letter, number, punctuation, and symbol keys found on a traditional typewriter.


Control keys. These keys are used alone or in combination with other keys to perform certain actions. The most frequently used control keys are CTRL, ALT, the Windows logo key with Picture of the Windows logo, and ESC.


Function keys. The function keys are used to perform specific tasks. They are labeled as F1, F2, F3, and so on, up to F12. The functionality of these keys differs from program to program.


Navigation keys. These keys are used for moving around in documents or webpages and editing text. They include the arrow keys, HOME, END, PAGE UP, PAGE DOWN, DELETE, and INSERT.


Numeric keypad
. The numeric keypad is handy for entering numbers quickly. The keys are grouped together in a block like a conventional calculator or adding machine.

Search and Organize in Windows Vista

Explore the new Windows Vista start menu.

Looking for specific applications, Web sites, and e-mails
is faster than ever with the streamlined Windows Vista
start menu. To find a specific application or file, click the
Windows key on the keyboard (or open the start menu)
and enter the file name in the Instant Search field. As
you type, Windows Vista dynamically searches filenames,
metadata, and the full text of all files and displays the
choices by file type. For example, type “out” to find
Microsoft® Outlook®.


Discover the new Vista search explorer.

Try filtering by type using the search pane and selecting
Documents. Next choose to see your files in another way,
via the new stack view. Select the author column header
control drop down menu, and choose the option to Stack
by author. Explore all the documents by a particular
author by double clicking on an author’s stack. Now, save
that search as a new search folder. Choose the option
Save Search found on the top command bar and name
and save your search folder. In the future, to
re-run it, simply select the Searches folder link on the
left side navigation pane, and double click on your search


Experience the enhanced user interface.

If your PC supports the Windows® Aero™ user experience,
open multiple files and see how easy it is to locate the
right open window using the breakthrough Windows Flip
(simply ALT+TAB) or Flip 3D (Windows key+TAB).

How to choose the Right Windows Vista Edition

It has been confirmed that Microsoft's next generation operating system "Windows Vista" will be available in stores from January 2007. Microsoft has been working hard past few years for this release and I believe this version of Windows is worth buying.

Windows Vista Editions
Unlike Windows XP, Vista comes in 6 different versions and each of them is different in its features and price. Obviously you will be at confusion while choosing from the different versions.

1. Windows Vista Starter Edition
This version is the stripped down version of the basic home edition. This means it has the lowest feature set and security. It is more like a demo for all other editions of Vista. This version is only available in emerging regions like India, Russia, Mexico, Indonesia & Thailand.

2. Windows Vista Home Basic Edition
This is more like Windows XP Home Edition. Just the enough features for casual Internet browsing and entertainment. This edition does not have the important features like Aero UI & Windows media technologies.

3. Windoes Vista Home Premium Edition
This is more similar to Windows XP media centre edition. It has all the important features required for normal Home entertainment PC. This edition comes with Aero UI, Scheduled back up feature & premium games. Thus if you are addicted to XP media center edition, this is the vista equivalent for you.

4. Vista Business Edition
Business Edition of Windows Vista is equivalent to XP Professional Edition. It has all the features of Home Premium Edition except parental control and has some additional feature for faxing & scanning. This also has shadow copy - system back up & recovery service to keep your data safe. If you are a XP Pro fan like me, this is the right version to look forward.

5. Vista Enterprise Edition
From the name itself, it should be clear that it is for big enterprises where data protection is important. The major difference between Vista Business and Enterprise is the added data encryption & security features. You only need to buy this version if you are running a business and need more security for your data.

6. Vista Ultimate Edition
If you have all the designed features of Windows vista in one package, you call it Windows Vista Ultimate. It has all the features of Home Premium and Business Enterprise Editions. Unfortunately, I'm yet to learn the prospects of this edition.

Thus if you are an avid gamer, movie enthusiast or an audiophile, Home Premium is the best choice. If you just need a PC for emailing and document processing, Vista Home Basic is your edition. For small businesses, I would recommend Vista Business Edition.

Windows taskbar

In Windows, the default location for the taskbar is at the bottom of the screen, and from left to right it contains by default the Start menu, Quick Launch bar, Taskbar buttons and Notification area[1]). With the release of Windows XP, Microsoft changed the behavior of the taskbar to take advantage of Fitts' law.

- The Start menu contains commands that can access programs, documents, and settings. These commands include Programs, Documents, Settings, Find, Help, Run, and Shut Down.
- The Quick Launch bar, introduced with Internet Explorer 4, contains shortcuts to applications. Windows provides default entries, such as Internet Explorer, and the user or third-party software may add any further shortcuts that they choose. A single click on the application's icon in this area launches the application. This section may not always be present: for example it is absent by default in Windows XP, although it can be enabled.
- The Windows Shell places a taskbar button on the taskbar whenever an application creates an unowned window: that is, a window that doesn't have a parent and that is created according to normal Windows UI guidelines. Typically all SDI applications have a single taskbar button for each open window, although modal windows may also appear there. Windows XP introduced taskbar grouping, which can group the taskbar buttons of several windows from the same application into a single button. This button pops up a menu listing all the grouped windows when clicked. This keeps the taskbar from being overcrowded when many windows are open at once.
- The last part of the taskbar is called the notification area. It contains mainly status notifications, though some programs, such as Winamp, use it for minimized windows. The clock by default appears here, and applications can put icons in the notification area to indicate the status of an operation or to notify the user about an event. For example, an application might put a printer icon in the status area to show that a print job is under way, or a display driver application may provide quick access to various screen resolutions. In Windows XP, the user can choose to permanently display or hide some icons, or hide them if inactive for some time. A button allows the user to reveal all the icons. Optionally, a clock can be displayed in the notification area. A class of utilities typically called taskbar clock replacements can replace the Windows XP taskbar clock with a clock with more features.

Customizing the Start Button Text of the Windows XP

Most computer users who have long been utilizing the Windows XP Home and Professional operating system suite versions are so sick and tired of that green conventional button on the bottom left-most portion of their desktop. The perpetual "Start" has been on this button since time immemorial or since Microsoft released the first of the Windows operating system suite version.

This is why most intermediate to highly skilled Windows XP users are tweaking the system registry so as to fully customize the look and feel of the Windows XP desktop that they have on their computers. Some people turn to the familiar faces for computer help, while other people turn to experts and technical support professionals for their computer issues. Among the concerns, the deemed most troubling thing to do is to actually change the unblinking and equally unchanging "Start."

Fortunately, there are steps you can take to impose a different kind of change in this area on your Windows desktop. But do take note of the fact that the computer help steps that follow below are applicable only to the Windows XP desktop, both Professional and Home versions, and not the prior and latest versions from the Windows Operating System suite.

These steps may not require professional computer help or technical support. The first thing you should undertake is to identify and determine a program, which could decompile and modify 32bit Windows EXE files. Such a program should also have the function to compile and save Windows executable files, which all have the .exe extension. This is because in order for you to change the information on the Windows XP Start button, you need to decompile and modify the explorer.exe file. It is in the C:\Windows folder that the executable file is located. Use the program to enhance the Start button of your computer. This is achieved by compiling and saving the changed explorer.exe file.

You can do a search on Google or any search engine for such a program. But if ever you have difficulty searching, one recommendation is to utilize The Resource Hacker™. This is one tool that provides functions and features to decompile and modify 32bit Windows EXE files. This application can also compile and save the functionally modified Windows executable files. This program is freeware, which means that you could freely download and subsequently use it without costs.

When you have downloaded this application, there isn't a need to install it on your computer system since it is a 32bit Windows application. But before you modify the explorer.exe file found in the C:\Windows folder, you should make a back-up and save the file in a different folder or disk partition.

Backing up the explorer.exe file can be done by copying and pasting the file on a different location. It can be pasted anywhere on your computer other than the C:\Windows folder. You should consider pasting it on an entirely different location from the system partition of Windows XP. Doing so would provide you the flexibility of reversing your computer system to its original Explorer default settings, if ever you do something harmful to both the file and the system registry.

Using the Resource Hacker™'s program, open the explorer.exe file located in the C:\Windows folder. Pressing the Tab key on your keyboard would put you in the actual right pane window of the application. Navigate to the String Table option by using the arrow keys. After doing so, expand the selection by again pressing the Tab key. Highlight the option string 37 within the String Table option, and press the right key so as to expand it again. Navigate to the 1033 option or to the 38 option, in case you are actually using the functional Classic desktop layout instead of the Windows XP desktop layout.

After doing so, press the Tab key again; this would take you to the right window pane of the program. This contains the scripts and codes of the String Table 1033 or 38 of the explorer.exe file. Item number 578 contains the quoted text Start, which is what you are looking for. Carefully leaving out the quotes, delete the boring word Start. Then, type in the word of your choice, but ensure that it is inside the quotes you have left out.

Now press the Tab key repeatedly until it takes you to the Compile Script button. Press the Enter key that you'll find in it. After you have compiled the functionally modified explorer.exe file, navigate to the File menu of the program and choose Save as option. Save it with another filename different from the explorer.exe, but use the .exe extension for the tweaked file. Save it in the C:\Windows folder of your computer.

You should then modify the system registry of your Windows XP Operating System. Press the keystroke Windows key plus R, and type in "regedit" in the edit box supplied by the Run Command window. This would take you to a dialogue box with functions and features in editing the system registry.

Navigate to the HKEY_LOCAL_MACHINE\SOFTWARE\Microsoft\Windows NT\CurrentVersion\Winlogon item, and carefully go through options one after the other. Navigate to the Shell option, and right click on it so as for a menu box to appear. Select the Edit String menu item on the dialogue box. This would take you to a new area in the window where the string values and other codes are to be found.

In the text field entitled "Value data:", key in the filename of the functionally modified explorer.exe you have saved in the C:\Windows folder. Press the Tab key repeatedly until it takes you to the OK button of the window. Press the Enter key on it.

You have now successfully modified the explorer.exe file, as well as the system registry of your Windows XP operating system. The latter computer help procedure is important since the operating system needs to keep track and adjust to the changes made to the registry. Afterwards, the desktop will now contain and display the new word you have keyed in on the modified explorer.exe file, but only after you have restarted your computer.

Caps Lock by accident

caps lock

How many times you typed long text in MSWord and after you noticed "Caps Lock" were turned on? All you typed were case letters and you have to type again. You can change case with Shift + F3, too, but you have to make further effort and you will get nervous, that's almost shore.

Here's a tip how you can avoid that. You can attach sound to Caps Lock key and you'll here it when you turn it on by an mistake. Here's how you can do that trick:
Go to Start - Settings - Control Panel. Now go to Accessibility Options. Meny "Accessibility Properties" will open. There, chose "Use Toggle Keys" in "Toggle Keys" (in lower meny, click OK and that's it.

Gmail and Outlook Express

email

If you have an Gmail account you have almost 3 gigabytes space on their servers and some people use that space as storage for their messages. But you can also have access to Gmail through Outlook Express, too if you like. In that case you can write mails and answers using Outlook Express advantages. You can use Stationery and other possibilities.
To start with that, you have to do following:

- Open Outlook Express and go to Tools – Accounts
- Click on Add – Mail
- Type your name and click Next
- Type your Gmail address and go Next
- In «Incoming mail (POP3, IMAP or HTTP) server», type pop.gmail.com
- In «Outgoing mail (SMTP) server», Type smtp.gmail.com
- Click Next
- Write your full gmail address in Password
- Go Next and than Finish
- Pick up pop.gmail.com account you just made
- On Servers card, click Properties
- Under «Outgoing Mail Server» check My server requires authentication.
- Go to Advanced
- Check «This server requires a secure connection» (SSL) under «Outgoing mail (SMTP)» and under «Incoming mail (POP3)»
- On Outgoing server (SMTP) type 465. If number under Incoming server (POP3) didn't automatically changed to 995, type 995.
- Click OK and than Close.

Cobra Security 2010 Complete Edition [Build 2]


Cobra Security 2010 Complete Edition


Cobra Security 2010 Complete Edition [Build 2]


Best freeware security solution for your computer. Main components are Prevx CSI, McAfee & SpywareBlaster. Other components like F-Secure, NOD32, Trend Micro and others, these are stand alone virus scanners. Some components are Online Virus Scanners and you can add these components every time from our website. Thanks to these Components is Cobra Security 2010 very useful and safe for every computers. Also you can Install Cobra Security to USB Device and later you can use it anywhere where you want. Cobra Security 2010 Anti-Virus component scan your entire computer in 2 minutes.


Cobra Security 2010 includes:

avast! Virus Cleaner\
Avira AntiVir Virus Remover\
CWShredder\
Dr.Web CureIt!\
F-Secure Easy Virus Cleaner\
McAfee Avert Stinger\
McAfee SiteAdvisor\
Multi Virus Cleaner\
NOD32 On Demand Scanner\
Prevx CSI\
Sophos Anti-Rootkit\
SpywareBlaster\

Features:

Anti-Virus (Real-Time Protection)
Anti-Virus: Detects Viruses, trojans, spyware, dialers, adware & other
Web Protection (Real-Time Protection)
Anti-Spyware (Real-Time Protection)
Anti-Spyware: Detects Spyware & Adware
Firewall (Real-Time Protection) NEW!
Firewall: Detects hackers & malicious programs
System Protection NEW!
System Protection: System, file & data protection
Anti-Spam (Real-Time Protection)
Anti-Spam: Email Protection
Multi-Engine Virus Removal Tools
Online Backup
PC Optimizer
File Recover
Strong Encryption
Don´t slow down your system
Use it anywhere (Any Computer, USB, CD/DVD or any other device)
Anti-Virus - Automatic database updates
Can update Cobra Security components separately
Clean Install
Free of charge

Extra added:

Added new Virus Scanner NEW!
Added PC Diagnostic Tool NEW!
Added 2 Web Browsers NEW!

Babylon Portable

Babylon Portable
Download:
http://rapidshare.com/files/241863157/Cobra_2010b2.www.whereweget.com.rar

Compression tools AIO 35 in One


Compression tools AIO 35 in One


Compression tools AIO 35 in One


This package contains the best compression tools till now:
CCZIP V5.1
EXPRESS ZIP
ALZIP V6.62
AETSPLITZ V4.0.1
IZARC V3.81BUILD1550
KGB ARCHIVER V1.2.23
PORTABLE KGB ARCHIVER
WINUHA V2.0
WINZIP SELF-EXTRACTOR V3.1.7556
POWER ARCHIVER2007 V10.20.17
ZIPGENIUS V6.3.1140
POWERZIP V7.0.6
ZIP IT FAST PRO V3.0
ZIPZAG V1.80
SUPER ZIP3.0
TURBO ZIP V6.0
PICO ZIP V4.01
WINRAR V3.71
PORTABLE RAR RECOVERY TOOLBOX V1.1.4.7
DISKINTERNALS ZIP REPAIR V1.0
ADVANCED RAR REPAIR V1.0
ADVANCED ZIP REPAIR V1.7
ZIP REPAIR PRO V2.1.0.30
SFV CHECKER V1.17
WINRK V 3.03
VISUAL ZIP PASSWORD RECOVERY V6.0
ULTIMATE ZIP CRACKER V7.3.1.5
WINRAR PASSWORD BREAKER
ZIP PASSWORD RECOVERY
ZIP PASSWORD FINDER V1.0
RAR KEY V7.0.1180
ARCHIVE IDENTIFIER V0.06
SH ARCHIVE IDENTIFIER V 2.70
EXPRESSOR V1.4.5.1
ZIP SCAN V2.2D ...

Enjoy Agroni112

Babylon Portable

Babylon Portable
Download:
http://rapidshare.com/files/239254173/Compression_Tools_AIO.www.whereweget.com.rar

Hits Page

web counter html code

License

Entertainment (Music) - TOP.ORGBest Indian websites rankingEntertainment Blogs - Blog RankingsBlogRankers.comsoftware Free Downloads
EntertainmentTop Entertainment blogsSoftware Blogs - Blog Catalog Blog DirectoryTop Blogs
Submit your website to 20 Search Engines - FREE with ineedhits!@Submit!-FREE PromotionSearch Engine Marketing & OptimizationSubmit Your Site To The Web's Top 50 Search Engines for Free!
Haroof Top SitesWebsite Promotion

Website Promotion

Language Translate

Visitors FlaGs

free counters

Live map

Pages

Powered by Blogger.

Live Traffic Feed

Categories

Followers

About Me

My photo
Come and lets get fucked bitches and m0r0nx ! wh0 try t0 cheated u ! this world is s0 selfish and careless =X u can easily fucked them by try t0 my hacking t00ls and s0ftwares =] i gifted t0 u these all things =] this w0rld d0es,nt care any0ne , s0 why u st0pped ? fuck all those wh0 try t0 cheat u, s0mething wr0nG u, anD dishearted t0 U ! Fucked them and feel free t0 life ! Enj0y =] prO X haCker's TeaM Private Contact = abzoz_killer981@hotmail.com
| Tuesday, June 9, 2009 |


Opera 9.6: Speed Dial


Here's another dose of the Opera Web browser for you! If you didn't already know, the people over at Opera recently released the new Opera 9.6 and it's now available for download here. Opera claims to be the only browser that comes with everything you need to be productive, safe and speedy while online. Let’s take a quick look at the Speed Dial feature available in the new version. Here we go!

Speed Dial is a new method of quickly browsing to your favorite Web sites. When you hit the New Tab button, instead of the usual blank page, you'll see a 3 x 3 grid. The grid takes up the full screen and it's laid out in the fashion of a telephone dial with numbers from 1 to 9. Each number can be populated with a different URL, selected from either your existing favorites or entered manually. Now, I know you might be thinking that nine speed dials is not nearly enough. Well, lucky for you, there's an easy way to increase the number of speed dials. Let's check it out, shall we?!


1.) Open Opera and go to Help, About Opera. That will open a page that shows the version information, as well as, other useful information about Opera. Check the Paths section and copy the path for the Opera Directory.


2.) Close Opera and paste the path into the Run dialogue box. Hit OK and you'll then see the Opera profile directory.

3.) You’ll see the “speeddial.ini” file in the folder. Open the file in Notepad and add the following lines to the end of the file:

[Size]

Rows=4

Columns=5

In the above code, 4 and 5 are just examples. You can replace them with your desired numbers.


4.) Save the file and open Opera again. Now, you’ll be able to see more speed dials in Opera!


Enjoy it, my friends!


| |

Orkut Softwares

Here in this post, I'm going to tell you about three softwares which can be very usefull while doing orkuting.

1. Orkut Cute: It is an interesting software
which can be used for:

* Sending a same scrap to all your friends including hyperlinks.
* Starting a same topic in all your communities.
* Get Notifications like "New Profile View" or "New Scrap" etc.

2. Orkut Scrapboy: This is awesome software generally known as Orkut Messenger which can be used for sending and receiving instant scraps from your friends without a web browser. It gives you more Convenience and speed while scrapping.

3. Orkut Toolbar: This toolbar makes navigation in orkut much easier by providing some user friendly buttons in menus. It also provides features like Pop up Blocker, email alerting, Online Radio etc.

All these softwares are easily available on many internet websites which can be downloaded free of cost. You can search these softwares on your favourite search engine.


| |

Optimize Computer Performance


Some people think that optimizing the computer's performance is a difficult task. But, it is actually a simple and easy task. Just take the following simple steps to optimize the computer's performance. Use all these tips together to get good results:

  1. Check registry files: Registry files control the software systems and programs on a computer. They can become damaged when you uninstall a program. Generally, uninstalling one program lead to a problem with another program that shared similar registry files. Therefore, use some good registry scanning software to determine if everything is working fine. There are lot of good registry scanners available in the market. Some of them are free wares. You can use any of these. (See my other posts on Registry Scanners: Abexo Registry Cleaner and Registry Cleaner Software).

  2. Remove unwanted icons from desktop: The easiest ways to optimize the computer’s performance is to cleanup the things on the desktop. The icons which you never use slow down a computer. Deleting these icons will free up some memory and speed up the computer. If you mistakenly install any application / software on the desktop, then be very carefull.

  3. Upgrade the Computer memory: Buying a memory may be costly, but it's very simple and easy way to speed up your computer. It will also fix memory errors if any. Before buying the memory / RAM for your computer, look for shops, make a survey and find a best value deal.

  4. Use Program uninstallers: Many times, when programs are removed, they leave behind some traces. So, use a program uninstaller to uninstall or remove installed software. Choose any good uninstaller software like Advanced Uninstaller PRO or Total Uninstall etc.

  5. Delete every unwanted program from the task bar. They utilize memory and slowdown the computer. You can do this by following simple steps:
  • Click on Start > Run. Enter MsCONFIG. Press enter key. Click on Start UP. Here you will find a list of start up programs.
  • Uncheck programs like real players, Office startup, Quicken Reminder, etc.
  • Do NOT uncheck systray, Explorer and Virus check or scheduler programs.


| |


Recover your Outlook Password


Sometimes, you might lost or forget passwords to your personal folders and you lost the important data. In such situations, it is very important to recover the password.

You will be happy to know that OutlookPassword is software which can help you to recover password-protected Outlook personal. It's recovery engine is capable of recovering any password instantly. But, please note that there is no way to decrypt the original password.

Basically, OutlookPassword will generate a "fake" password which is accepted by Outlook as valid one. It's absolutely impossible to recover your original password if it is of more than 4 characters.

The best thing is the latest version supports all Outlook versions. You may download it at the following URL:

http://lastbit.com/outlook/default.asp


| |


Print Pictures only from Web sites


When you browse Internet, you might want to print a picture from any of the website of your interest. There is a simple way for that. Just follow the below steps:

  • Right click on image
  • Chooses the option Print Picture

If you want to edit the picture before printing, then first save this picture file on your computer. Edit the picture using any image editing software. Now, you can print the edited image.


| |

Abexo Registry Cleaner

It is a useful Registry Cleaner utility that can insure your computer / laptop runs as efficiently as possible.

A problem in the Registry may become an issue on many computers. As you use your computer; install and uninstall softwares, a lot of invalid entries go into Windows registry
which can cause system complications and slow down your computer significantly.

Unfortunately, there is no cleanup ability within the windows registry to remove these kinds of bad or outdated entries. But, with the help of Abexo Registry Cleaner you can remove the obsolete registry entries and fixes the errors.

In this registry cleaner, there is a registry defragmenter which is also called as compressor. It removes the empty spaces after a registry cleanup and reduces Windows registry size. Registry de-fragmentation increases the speed and overall performance of your computer.

If you want to know the power of Abexo Registry Cleaner, I would recommend you to clean your windows registry with some other companies’ registry cleaner. Then, clean the registry
of with Abexo Registry Cleaner. Now, see how many more registry errors Abexo Registry Cleaner will find.

Also, there is a 30-day unconditional money-back guarantee on Abexo Registry Cleaner. You may download it from the below URL:

http://www.abexo.com/free-registry-cleaner.html


| |


Copy a path to the Clipboard


Many times, you may want to obtain a copy of the path of a file or folder in the hard disc of your computer. You may need this very frequntly in the organization or office.

Most of us do this by following below steps:

  • Launching the Windows Explorer
  • Traverse the directory to the file / fiolder
  • Select the contents of the address bar
  • Copy the path and paste it in Notepad
  • Finally, type the filename itself.

But, you will be glad to know that with Windows Vista, you no longer have to perform these steps to get the path to a file. It is very simple and easy. Just hold down the "Shift" key, right-click on the file or folder, and select the new command titled "Copy as Path". Now, the path of file / folder will be copied to the Clipboard. You can paste it anywhere with "CTRL + V".


| |


Trace a Gmail Email Account


Copyright © 2008 Ed Opperman

When Gmail first threw its hat into the email ring a few years ago, its service was open only to those who had received an invitation. Now, however, it's free and has exploded into one of the most popular email services available - thanks to Google's trusted brand name, its simplicity, the huge amount of storage space available for absolutely free, extra features (such as POP3 access), embedded web and video chat, and so many more! Is it any question, then, that millions of people are already using Gmail - even though it's a relative newcomer on the email scene?

And though Gmail's spam filters are among the best available, there is a chance that, at some point, you'll receive unwanted email - and it might even be from a Gmail address. In such an instance, your best bet is to use Gmail's own reverse email search; it's easier for Gmail, after all, to search its own records than to have an outside source looking in. See what you're able to discover about the sender. (Gmail is especially attractive to those wishing to remain very much anonymous, because the headers in any given piece of mail are stripped of any and all IP information. Thus, the stalker or hacker believes himself or herself to be secure.)

Even if you don't have much luck, or any at all, you are far from out of options. In fact, now would be a good time to check out one of the many free independent reverse email search engines available online. When using these sites, the key is to remain tenacious - because it may take a good while before you produce results. Giving up is the last thing that you want to do; after all, even if the reverse email search engine you are using isn't having any success at all, bear in mind that there are those services which, for whatever reason (and there exist a few possibilities), have more success than others!

If you are still having little to no success, or if the email received was of a particular harmful or malicious nature, you might want to consider contacting a third party for some needed extra help. I am referring to professional investigators who specialize in online matters, since they have tools at their disposal not necessarily available to you. Every step taken online leaves a 'footprint' - data that can be tracked and which will inevitably lead to the person who has been taking the steps all along. This is true even if the person in question is using dial-up or a handful of proxies; while these factors could slow down a search, they are never able to stop a search in its tracks altogether!

Private investigators often have access to what is known as the "deep web" - information not available through conventional means such as, say, a simple Google search. So always remember that the only way to ensure your subject gets away is for you to run out of steam and simply give up. Otherwise, you should inevitably be able to find the information that you are looking for! Best of luck!

------------------------

Ed Opperman is president of Opperman Investigations Inc He is considered an expert on the reverse email search and online investigations Visit http://www.emailrevealer.com to end your fears.


| |


Opera 9.6: Speed Dial

Here's another dose of the Opera Web browser for you! If you didn't already know, the people over at Opera recently released the new Opera 9.6 and it's now available for download here. Opera claims to be the only browser that comes with everything you need to be productive, safe and speedy while online. Let’s take a quick look at the Speed Dial feature available in the new version. Here we go!

Speed Dial is a new method of quickly browsing to your favorite Web sites. When you hit the New Tab button, instead of the usual blank page, you'll see a 3 x 3 grid. The grid takes up the full screen and it's laid out in the fashion of a telephone dial with numbers from 1 to 9. Each number can be populated with a different URL, selected from either your existing favorites or entered manually. Now, I know you might be thinking that nine speed dials is not nearly enough. Well, lucky for you, there's an easy way to increase the number of speed dials. Let's check it out, shall we?!


1.) Open Opera and go to Help, About Opera. That will open a page that shows the version information, as well as, other useful information about Opera. Check the Paths section and copy the path for the Opera Directory.


2.) Close Opera and paste the path into the Run dialogue box. Hit OK and you'll then see the Opera profile directory.

3.) You’ll see the “speeddial.ini” file in the folder. Open the file in Notepad and add the following lines to the end of the file:

[Size]

Rows=4

Columns=5

In the above code, 4 and 5 are just examples. You can replace them with your desired numbers.


4.) Save the file and open Opera again. Now, you’ll be able to see more speed dials in Opera!


Enjoy it, my friends!


| |


Folder Lock

Are you tired of your friends, co-workers or children messing with your important computer files? Well, it doesn't have to be like that anymore! If you start using Folder Lock, you'll see just how easy it can be to safeguard your sensitive files against unwanted access. Folder Lock works with Windows Vista, XP, NT, ME and 98 and it's so easy to use. Let's check it out, shall we?!

Folder Lock is a fast data encryption and password protection program for Windows. It can simultaneously encrypt, lock and password protect your files, folders, drives, USB drives and even your CD/DVD ROM drives.


Folder Lock creates encrypted storage spots called "lockers." You can keep as many of your private files and folders as you want in your locker and password protect them with just a single click. You can transfer, secure and back up your lockers as well. The lockers are portable, meaning you can keep them on a flash drive, on a CD or DVD or you can transfer them via e-mail. Plus, the lockers are incapable of being deleted as long as Folder Lock is installed on your computer.

You can treat the lockers just as you would in the physical world. For example, each single user can create multiple lockers with different passwords. With Folder Lock, you can choose to either encrypt using 256-bit AES on-the-fly encryption or you can lock your files, folders and drives anywhere on your computer. Each locker can contain your encrypted files, as well as, your personal list of locked items.

Furthermore, Folder Lock's options, such as hack attempt monitoring, stealth mode, data shredding, history cleaning and auto protection can enhance data security beyond anything ever achieved before. In addition, a locker's Delete, Move and Rename options are password protected to prevent data loss.

If you're interested, you can download Folder Lock for yourself right here. Enjoy!


| |


Website:-Troovi

Would you like to share your photos online in high quality? Well, now you can with Troovi!

This Web site is so easy to use! Just click on the Choose Photos button to get started. That will open your computer's Open menu, so go ahead and select the photo you’d like upload. Free users can upload 15 images at a time, so don’t be shy!

Once you’ve selected all the photos you want to upload, click on the Upload button. Once they're uploaded to the site, a window will come up. The window contains the link you need to see the photos you’ve uploaded. It's very important for you to copy and paste that somewhere to save it. I like to paste the URL into Notepad. The window that popped up also gives you the option to send out your photo collection via e-mail.

When you’re finished filling out the e-mail form to share your photos with all your friends and family, just click on the Finished button. E-mailing it to yourself is another great way of saving your unique link. (Make sure you check your spam folder as well, because that’s where my e-mail ended up).

After you’ve uploaded the initial batch, you can add more photos by clicking on the Add More Photos button. It works the same way as it did the first time you did it. I hope you have fun with Troovi!

http://troovi.com/


| |


Website:-Study Stack

Welcome to Study Stack! This is my favorite study Web site, because it integrates studying not only by traditional means (think flashcards), but it includes studying by playing games. I love to recommend this site to my friends in class who are getting ready to take the GRE (Graduate Record Examination).

Start by selecting the subject matter you’d like to study from the list provided. You’ll then be taken to a much larger list that has study stacks for the specific topic you chose. Choose a study stack from the list and you'll be taken to its page. There you can choose the method you'd like to study. Your options are: Notes, Flashcards, Study Stack, Study Table, Matching, Hangman, Crossword, Word Search, Unscramble, Type In, Bug Match, Export, Print, Edit, E-mail and Hmm.

Three options I really want to point out to you are Export, E-mail and Print. Export allows you to download the date to your cell phone, PDA, computer or even your iPod. The E-mail option allows you to send the address of the study stack to your friends via e-mail. Print allows you to print out flashcards in several different styles to use offline.

You can also add your own study materials if you can’t find what you need to study. To add your own, scroll down to the bottom of the list for the subject you want to study and then click on the Create Your Own link.

You’ll need to register to add your own material. It's really easy if you have a Facebook account, because you can use that to log in. If you don’t, that's okay too! Just register for Study Stack. To do so, fill out the registration form with a username, e-mail address, password and agree to the terms and conditions. It’s that simple!

Once you’re logged in, you can also create a study stack by clicking on the Create a New Stack link under your Stacks tab. You’ll need to name your stack, type in a description for it and decide whether you want to let other users edit it or whether you want it to auto-generate for the games.

Now, click on the Data tab. That's where you'll be able to insert the data you want to study. Type in the questions, then the answers and make sure you click on the Save Changes button when you’re done updating the data information.

Before you know it, you’ll have your study stack completed and you'll be ready to start using it. Pretty neat, huh?!

http://www.studystack.com/


| |


Website:-Where's My Cell Phone?

I'm notorious for losing my cell phone around my house and in my car. But with this Web site, I no longer have any trouble finding my cell phone!

All you have to do is put in your cell phone number and click on the Find It button. The service will call your cell phone for free and let it ring so that you can find it. It only takes a few seconds!

You can ring your phone once every five minutes until you find it. They don’t keep any of the numbers they dial, so you don’t have to worry about them using your information.

This is a very handy tool! There's even a gadget you can add to your Google homepage (if you use Google) that allows you to use it right from there.

I’ve bookmarked this site and if you lose your cell phone the way I do, you’ll want to do the same!

http://www.wheresmycellphone.com/


| |


Website:-My Live Signature

I’m really excited about sharing this Web site with you! My mom sent it to me after she used it to create a signature she could use for her work e-mails. I recommend starting with the Quick Tour.

The Quick Tour will not only walk you through the whole process, but it will also explain all the different ways you can make your signature. You'll want to get a static signature, because they’re free! (Only the static ones created from the wizard or with the draw tool are free).

To get started making your signature, click on Start Now. You’ll then need to choose whether you want to use the wizard or the draw tool. I recommend using the wizard, because it was a lot more fun to select a font that matches my hand writing than to draw a deformed version of my signature with the mouse.

To use the wizard, click on the Create Signature button underneath the text that says “Create a new signature using our wizard.” That will lead you to a page where you’ll be presented with three options: wizard, draw or upload. You'll want to select the wizard, which is the first option.

After selecting the wizard tool, you’ll be asked to type in the name or nickname you’d like to use for your signature. I put in Amanda @ WorldStart.com, which is how I sign my e-mails. In the next step, you’ll select which font you want to use. There are around 120 different fonts you can choose from and they may take a minute or tow to load. Click on the bullet of the font you want to use and then click on the Next button at the bottom of the page.

The next step is to select the size you want your signature to be. I like mine rather small, so I selected size 2. There are ten different sizes to pick from, so you’ll have plenty of options. Click on the Next button to continue. Here you'll select the color of the font you want to use for your signature. There are ten different colors to choose from. Next, you can set the slope of your signature. There are ten different slopes to choose from as well. You’re finally finished!

Take the code they give you for your signature (signature ID) and copy it. Then paste it on the Start Now page under the Download a Signature heading. The other thing you can do with the signature ID is paste it under the Generate a Code section. That will give you a choice between an HTML code and a BB code. If you want to use it on a forum, choose the BB code. If you want to use it on a Web page, choose the HTML code.

Now, you have a personalized signature all your very own. Yes!

http://www.mylivesignature.com/


| |


Website:Thanks-O-Meter

I truly believe that kindness triggers more kindness. An excellent example of that happened to me recently. My roommate and I were on our way to an appointment with her doctor. We got in the car and were all set to go when we remembered we left the cookies we made for her dad in the house. So, she tries to back into the drive way, but misses it and hits a snowdrift in our yard. We try to pull back out, but we were stuck! Then one of our neighbors came out of his house to walk his dogs and sees that we're in trouble. He takes his dogs back in the house, grabs his shovel and dashes across the street to help us.

Thanks to his kindness, we were able to get to the doctor’s office on time and we arrived in enough time to help an elderly woman get past the icy walkway. We helped her into the office and she was so grateful that someone would help her, she couldn’t stop smiling. Once she was settled in to wait on the doctor, I noticed she was seated across from a little girl with the flu who just looked miserable. The woman we helped struck up a conversation with her, got her to smile and took her mind off being sick.

With all the bad news in the world these days, it was so refreshing to find this Web site. Thanks-O-Meter celebrates those every day events of kindness, charity and anything that deserves a thank you!

It works by you selecting a thank you, choosing how it made you feel and then sharing your story. For my story, I chose "For Being Great Neighbors" and it made me feel lucky and grateful. Then I selected to share my story. It was hard to keep it within the 500 character limit, but I managed to do it.

Don’t have anything to share right now? Well, that’s no problem! You can enjoy all the stories everyone else has submitted on the site. Just click on the Stories tab at the top of the page. Then select an emotion and it will give you a listing of stories you can read that were tagged with that particular emotion.


| |

A program for ending programs safely and effectively


Today I have free download for you all that has saved me a ton of headache. Have you ever read the fine print when you install a program? Almost all of them tell you to close all running programs before continuing with the installation. This seems simple enough until you actually try to do it. Stopping all running programs on a computer is a huge pain in the you know what. Well, that is where end-it-all comes in. This little hand program only serves one purpose; to end programs! Just launch end-it-all and closing all of your programs are just one click away!


This is the menu bar for end-it-all. The single "x" and the skull and cross bones are for closing or killing a single application respectively. The multi "x" and skull and crossbones will close all programs or kill all programs respectively.

"What is the difference between close and kill " you ask?. Closing a program will attempt to close it by asking nicely for it to stop. This works sometimes, but not others. Killing a program will stop a program dead in its tracks. This works all the time, but is a bit more harsh. You should try the close option first.

I think this program is great for what it does. If you want to give it a try, you can download it here. Just go to the page and click the "download set-up only file" link. Its even compatible with Vista!


| Monday, June 8, 2009 |

How to sort rows in Excel 2007

How to sort rows in Excel 2007

By default, you can sort columns easy in Excel 2007 (and other Excel versions). But what to do when you need to sort rows? Of course, you can do that manually but Excel 2007 can do that for you, too.

Sellect rows you want to sort.
In Ribbon, sellect Data card.
In "Sort & Filter" chose "Sort".
In Sort window, click Options button.
In "Orientation" chose "Sort left to right" radio button.
Click OK.
In Sort window with drop-down menus you can chose order and way you would like to sort rows.
Click OK.


| |

What is my IP address

You would like to know what is your IP address when you are connected on the Internet? You can get your answer on several different ways. You can go to whatismyipaddress.com and you'll see your IP and where are you on Google map. But if you need more information you can go to Start - Run, than type CMD and press ENTER. There, just type
"ipconfig/all" (without quotes) and press ENTER. You will get more than IP address, you'll see full profile of your connection like on image bellow:


| |

How to make folder private

folder private
If you are not the only user on your computer, you can make some forlders private and only when you log in with your username you can see them. This option is only available for folders included in your user profile. Folders in your user profile include My Documents and its subfolders, Desktop, Start Menu, Cookies, and Favorites. If you do not make these folders private, they are available to everyone who uses your computer.
Open My Computer. Then, double-click the drive where Windows is installed (usually it's drive (C:), unless you have more than one drive on your computer). Double-click Documents and Settings folder. Open your user folder. Right-click folder in your user profile you want make private, and then click Properties. On the Sharing tab, select the Make this folder private so that only I have access to it check box. When you make a folder private, all of its subfolders are private as well. For example, when you make My Documents private, you also make My Music and My Pictures private. When you share a folder, you also share all of its subfolders unless you make them private.


| |

Dont type http

While typing the website URL address in Internet Explorer of Mozilla Firefox url bar, there is no need to bother with typing the http://. All you need to do is start typing the WWW. Both Firefox and Explorer will add http:// in automatically when you start typing. For some websites you don't even type WWW, just what's after www. That other trick depends on website, although, so on some sites it won't work. But first tip for http will fork for all websites.


| |

How to email a group of contacts in Gmail

Another interesting and useful Gmail option is possibility to email a group of contacts . And that you can do on this way. Go to "Contacts". Than click on Group you would like to e-mail. On "Select" click "All". Or select just contacts you want to email. When contacts are selected, on right side just click "Email". Gmail will automatically redirect you to new message with field "To" filled. That's if you would like to everyone who receive this message see who else you mailed message. If you don't want that, copy addresses from "To" field to "Bcc" field and after that, leave just one address in "To". Than you can write Subject and message body and send it.

How to email a group of contacts  in Gmail


| |

Gmail - How to add contact in group

You need to add some email adress (contact) in your Gmail group (eg friends). And that contact is only in suggested contacts and you don't see Group menu on right side in Gmail. You need first add that suggested contact to My contacts or into Most contacted. Go to Suggested contacts, check particular check-box infront that e-mail adress and click Move to my contacts on right. Now, go to My contacts, check box by adress, click Groups menu right, and Add to group you want.

Gmail group contact


| |

How to merge rar files with Winrar

How to merge rar files with Winrar?

You have several rar files (file1.rar, file2.rar, file3.rar) you downloaded from internet and now you have to merge them into one file. First all that files must be in one folder. Do right click on file1.rar and go to Extract here. Chose folder what you like and extract. If you get pop up while extracting, like this:

rar password

that means you need password to merge files. Go to that page where you downloaded part rar files and you will see password there.


| |

How To Copy CD

To make a copy of a CD, you'll need a master to copy,
a blank disk, a CD-RW drive, and the proper software.

Most computers now include either a CD-RW or DVD-RW
drive. If not, you can purchase the appropriate drive reasonably cheaply.
Check out online prices or nip in to your local computer store for advice.

If you have a DVD-RW drive, you'll be able to copy
both CDs and DVDs. The rate of copying will vary,
with 4X being the slowest and up to 48X being the
fastest at the moment. If your drive supports 48X, you can duplicate
a CD in a matter of minutes.

Once you have the CD-RW or DVD-RW drive and some
blank CD-R media, all you need is the software to
duplicate. There is a huge range of CD buring software from freeware
to commercially available packages such as Nero. You will be spoiled for choice!

Once you have everything set up, just run the
software and create your disk. You can copy many
types of media, including pictures, video, audio,
and even data from your computer to a CD. Depending on what
you want to copy, all need to do is select it from the
software menu then sit back and let it rip.


| |

Change the default custom dictionary in MS Word

Word has simplified the way you work with custom dictionaries.

You don't need to use Notepad to make changes

In previous versions of Word, you opened a separate text editor, such as Notepad, to work with custom dictionary content.

In Word, you don't have to leave your document environment to make changes to your custom dictionaries. Instead, you use a simple, streamlined dialog box that's easily available by selecting the dictionary in the Custom Dictionaries dialog box, and then clicking Modify.

Dictionaries are clearly organized by language

When you create or install a custom dictionary, you can associate a particular language with it so that Word only uses the dictionary when you check spelling of text in that language.

The dictionaries are then grouped by language in the Custom Dictionaries dialog box, making it easy to locate and switch between them.

You can quickly change the default custom dictionary

If you use one custom dictionary more than others, you can quickly make it the default dictionary directly from within the Custom Dictionaries dialog box. The default custom dictionary is the one that words are added to when you select Add to Dictionary during a spelling check.


| |

Make business cards in MS Word

You can quickly create attractive and professional business cards in two ways using Word:

* Use ready-made business card templates from the Microsoft Office Online Templates Web site.

* Create your own business cards from scratch with the Envelopes and Labels dialog box.

Choose the right paper

You can either have a professional printer print your business cards or you can purchase paper and print them yourself at home. For home printing, Avery® is a popular do-it-yourself brand and provides standard business card paper: 2" X 3.5" cards on 8 1/2" X 11" heavyweight cardstock sheets. The tiny perforations in the sheets allow you to separate your business cards easily with professional results.

If you choose ready-made business cards from the the Microsoft Office Online Templates Web site, look for the Avery product number listed with the template. If you use the Envelope and Label feature in Word, the dialog box shows the product numbers for the Avery business card size you need.

label options

Choose the business card paper you want from the Product number list. The Label information area to the right shows a description of each paper or label type you select.

Work with a ready-made template

If you start with a template to make your business cards, all you need to do is change the default text to match your company and contact information. In just a few minutes, you'll be ready to print your cards.

Work from scratch using the Envelopes and Labels dialog box

Using the Envelopes and Labels dialog box, you can either print directly or insert your business cards in a new document for later use.
To make and print your business cards

1. On the Tools menu, point to Letters and Mailings and then click Envelopes and Labels.
2. Click the Labels tab, and in the Address box, enter the company and contact information you want to display on your business card.
3. Right-click to show the shortcut menu, and then choose the formatting and alignment options you want.
4. Under Print, leave the default selected, Full page of the same label. This allows you to print multiple business cards on a perforated, heavyweight cardstock sheet by Avery.
5. Click Options, and under Printer information, choose the printer you want.
6. Under Label products, leave the default selected, Avery Standard.
7. Under Product number, choose the business card number you want, and then click OK. If the product number you want is not listed, one of the listed labels still may be the size paper you want.
8. In the Envelopes and Labels dialog box, do one of the following:

* To print one or more business cards, insert your sheet of Avery heavyweight cardstock into the printer and then click Print.

* To save your business card for later use, click New Document, and then click Save on the Standard toolbar.


envelopes and labels

1 Address box: Enter your contact information. Using the shortcut menu, you can format and align your text.

2 Print button: Click to print your business cards directly from this dialog box.

3 New Document button: Click to insert your business card information into a Word document for later use.

4 Options button: Click to choose the type and size of Avery paper for your business cards.

5 Label area: View the paper type and size based on your selection in the Label Options dialog box.


| |

wildcard character

To start, let's define a couple of terms:

* A wildcard character is a keyboard character that you can use to represent one or many characters. For example, the asterisk (*) typically represents one or more characters, and the question mark (?) typically represents a single character.
* In our case, a regular expression is a combination of literal and wildcard characters that you use to find and replace patterns of text. The literal text characters indicate text that must exist in the target string of text. The wildcard characters indicate the text that can vary in the target string.

That may seem a bit abstract, but you've seen (and most likely used) wildcard characters and regular expressions since you first began computing. For example, the Open dialog box (on the File menu, click the Open command) uses the asterisk wildcard character extensively:

Wildcard characters in the Open dialog box

And, if you ever used the MS-DOS operating system, you probably used a command and a simple regular expression to copy files:

copy *.doc a:

That command uses the asterisk wildcard character and the .doc literal text string to copy a set of Word documents to hard disk drive A. If you look around a bit, you'll see that Microsoft Windows® and the Microsoft Office applications use wildcard characters everywhere.

The steps in this section explain how to use a regular expression that transposes names. Keep in mind that you always use the Find and Replace dialog box to run your regular expressions. Also, remember that if an expression doesn't work as expected, you can always press CTRL+Z to undo your changes, and then try another expression.
To transpose names

1. Start Word and open a new, blank document.
2. Copy this table and paste it into the document.

Josh Barnhill
Doris Hartwig
Tamara Johnston
Daniel Shimshoni
3. Press CTRL+F to open the Find and Replace dialog box.
4. If you don't see the Use wildcards check box, click More, and then select the check box. If you don't select the check box, Word treats the wildcard characters as text.
5. Click the Replace tab, and then enter the following characters in the Find what box. Make sure you include the space between the two sets of parentheses: (<*>) (<*>)
6. In the Replace with box, enter the following characters. Make sure you include the space between the comma and the second slash: \2, \1
7. Select the table, and then click Replace All. Word transposes the names and separates them with a comma, like so:

Barnhill, Josh
Hartwig, Doris
Johnston, Tamara
Shimshoni, Daniel

At this point, you may wonder what to do if some or all of your names contain middle initials.


| |

Microsoft Office Groove 2007

Groove 2007 is a collaboration software program that brings teams together to work on project activities and share information — anywhere, anytime, with anyone. Teams use Microsoft Office Groove 2007 for a broad range of projects, from simple document collaboration to custom solutions integrated with business processes. Working in Groove 2007 workspaces saves time, increases productivity, and strengthens the quality of deliverables.

This product guide provides an overview of Groove 2007 and highlights some of its key new features. It also offers a real-world scenario that illustrates how Groove 2007 helps a distributed project team collaborate more effectively. Download this document to learn more about Groove 2007.

Microsoft Office Groove 2007 Requirement

Computer and processor - 500 megahertz (MHz) processor or higher
Memory - 256 megabyte (MB) RAM or higher
Hard disk - 1 gigabyte (GB); a portion of this disk space will be freed after installation if the original download package is removed from the hard drive.
Drive - CD-ROM or DVD drive
Display - 1024x768 or higher resolution monitor
Operating system - Microsoft Windows XP with Service Pack (SP) 2, Windows Server 2003 with SP1, or later operating system.
Integration with Windows SharePoint Services requires connectivity to Microsoft Office SharePoint Server 2007 or Windows SharePoint Services 3.0. Built-in InfoPath Forms Tool requires Microsoft Office InfoPath 2007. Groove/messenger integration requires Windows Messenger 5.1 or later or Communicator 1.0 or later. Includes a 1 year subscription to the Groove relay service.
Browser - Internet Explorer 6.0 or later, 32 bit browser only. Internet access (fees may apply).


| |

Whats new in 2007 Microsoft Office system suites

New suites, servers, and services in the 2007 Microsoft Office release will deliver additional functionality and new solutions. With updated packaging options, you will have more flexibility than ever before to adopt the specific technologies and solutions that best meet your business and personal needs.
1 Volume License customers who purchase Office Professional Plus 2007 or Office Enterprise 2007 may download Office Outlook 2007 with Business Contact Manager by visiting the volume licensing services Web site or may request the assistance of their reseller.
2 Microsoft Office Accounting Express 2007 is available in the U.S. only.
3 Microsoft Office Communicator 2007 is scheduled for release in the second quarter of 2007. International versions of Microsoft Office Communicator 2007 are scheduled for release in the second half of 2007.
4 ECM from Microsoft easily extends content management to every information worker in an organization through integration with familiar tools like the Microsoft Office system. Learn More.
5 The 2007 Microsoft Office System release provides core form creation and completion capabilities, as well as Forms services to facilitate the distribution and management of your electronic forms. Learn More.
6 The 2007 Microsoft Office system release includes sophisticated IRM capabilities and policy controls designed to help organizations safeguard digital information from unauthorized use


| |

Creating keyboard shortcuts to open programs

You can create keyboard shortcuts to open programs, which can often be simpler than opening programs using your mouse or other pointing device. Before completing these steps, verify that a shortcut was created for the program to which you want to assign a keyboard shortcut. If no shortcut was created, browse to the folder that contains the program, right-click the program file, and then click Create Shortcut to create one.


1. Locate the shortcut to the program for which you want to create a keyboard shortcut.

2. Right-click the shortcut, and then click Properties.

3. In the Shortcut Properties dialog box, click the Shortcut tab, and then click the Shortcut key box.

4. Press the key on your keyboard that you want to use in combination with CTRL+ALT (keyboard shortcuts automatically start with CTRL+ALT), and then click OK.

You can now use this keyboard shortcut to open the program when you're using the desktop. The shortcut will also work while using some programs, though it might not work with some programs that have their own keyboard shortcuts.
Notes

* The Shortcut key box will display None until you select the key, and then the box will display Ctrl+Alt followed by the key you selected.
* You cannot use the ESC, ENTER, TAB, SPACEBAR, PRINT SCREEN, SHIFT, or BACKSPACE keys to create a keyboard shortcut.


| |

Using your computer keyboard

Whether you're writing a letter or entering numerical data, your keyboard is the main way to enter information into your computer. But did you know you can also use your keyboard to control your computer? Learning just a few simple keyboard commands (instructions to your computer) can help you work more efficiently. This article covers the basics of keyboard operation and gets you started with keyboard commands.
How the keys are organized

The keys on your keyboard can be divided into several groups based on function:


Typing (alphanumeric) keys. These keys include the same letter, number, punctuation, and symbol keys found on a traditional typewriter.


Control keys. These keys are used alone or in combination with other keys to perform certain actions. The most frequently used control keys are CTRL, ALT, the Windows logo key with Picture of the Windows logo, and ESC.


Function keys. The function keys are used to perform specific tasks. They are labeled as F1, F2, F3, and so on, up to F12. The functionality of these keys differs from program to program.


Navigation keys. These keys are used for moving around in documents or webpages and editing text. They include the arrow keys, HOME, END, PAGE UP, PAGE DOWN, DELETE, and INSERT.


Numeric keypad
. The numeric keypad is handy for entering numbers quickly. The keys are grouped together in a block like a conventional calculator or adding machine.


| |

Search and Organize in Windows Vista

Explore the new Windows Vista start menu.

Looking for specific applications, Web sites, and e-mails
is faster than ever with the streamlined Windows Vista
start menu. To find a specific application or file, click the
Windows key on the keyboard (or open the start menu)
and enter the file name in the Instant Search field. As
you type, Windows Vista dynamically searches filenames,
metadata, and the full text of all files and displays the
choices by file type. For example, type “out” to find
Microsoft® Outlook®.


Discover the new Vista search explorer.

Try filtering by type using the search pane and selecting
Documents. Next choose to see your files in another way,
via the new stack view. Select the author column header
control drop down menu, and choose the option to Stack
by author. Explore all the documents by a particular
author by double clicking on an author’s stack. Now, save
that search as a new search folder. Choose the option
Save Search found on the top command bar and name
and save your search folder. In the future, to
re-run it, simply select the Searches folder link on the
left side navigation pane, and double click on your search


Experience the enhanced user interface.

If your PC supports the Windows® Aero™ user experience,
open multiple files and see how easy it is to locate the
right open window using the breakthrough Windows Flip
(simply ALT+TAB) or Flip 3D (Windows key+TAB).


| |

How to choose the Right Windows Vista Edition

It has been confirmed that Microsoft's next generation operating system "Windows Vista" will be available in stores from January 2007. Microsoft has been working hard past few years for this release and I believe this version of Windows is worth buying.

Windows Vista Editions
Unlike Windows XP, Vista comes in 6 different versions and each of them is different in its features and price. Obviously you will be at confusion while choosing from the different versions.

1. Windows Vista Starter Edition
This version is the stripped down version of the basic home edition. This means it has the lowest feature set and security. It is more like a demo for all other editions of Vista. This version is only available in emerging regions like India, Russia, Mexico, Indonesia & Thailand.

2. Windows Vista Home Basic Edition
This is more like Windows XP Home Edition. Just the enough features for casual Internet browsing and entertainment. This edition does not have the important features like Aero UI & Windows media technologies.

3. Windoes Vista Home Premium Edition
This is more similar to Windows XP media centre edition. It has all the important features required for normal Home entertainment PC. This edition comes with Aero UI, Scheduled back up feature & premium games. Thus if you are addicted to XP media center edition, this is the vista equivalent for you.

4. Vista Business Edition
Business Edition of Windows Vista is equivalent to XP Professional Edition. It has all the features of Home Premium Edition except parental control and has some additional feature for faxing & scanning. This also has shadow copy - system back up & recovery service to keep your data safe. If you are a XP Pro fan like me, this is the right version to look forward.

5. Vista Enterprise Edition
From the name itself, it should be clear that it is for big enterprises where data protection is important. The major difference between Vista Business and Enterprise is the added data encryption & security features. You only need to buy this version if you are running a business and need more security for your data.

6. Vista Ultimate Edition
If you have all the designed features of Windows vista in one package, you call it Windows Vista Ultimate. It has all the features of Home Premium and Business Enterprise Editions. Unfortunately, I'm yet to learn the prospects of this edition.

Thus if you are an avid gamer, movie enthusiast or an audiophile, Home Premium is the best choice. If you just need a PC for emailing and document processing, Vista Home Basic is your edition. For small businesses, I would recommend Vista Business Edition.


| |

Windows taskbar

In Windows, the default location for the taskbar is at the bottom of the screen, and from left to right it contains by default the Start menu, Quick Launch bar, Taskbar buttons and Notification area[1]). With the release of Windows XP, Microsoft changed the behavior of the taskbar to take advantage of Fitts' law.

- The Start menu contains commands that can access programs, documents, and settings. These commands include Programs, Documents, Settings, Find, Help, Run, and Shut Down.
- The Quick Launch bar, introduced with Internet Explorer 4, contains shortcuts to applications. Windows provides default entries, such as Internet Explorer, and the user or third-party software may add any further shortcuts that they choose. A single click on the application's icon in this area launches the application. This section may not always be present: for example it is absent by default in Windows XP, although it can be enabled.
- The Windows Shell places a taskbar button on the taskbar whenever an application creates an unowned window: that is, a window that doesn't have a parent and that is created according to normal Windows UI guidelines. Typically all SDI applications have a single taskbar button for each open window, although modal windows may also appear there. Windows XP introduced taskbar grouping, which can group the taskbar buttons of several windows from the same application into a single button. This button pops up a menu listing all the grouped windows when clicked. This keeps the taskbar from being overcrowded when many windows are open at once.
- The last part of the taskbar is called the notification area. It contains mainly status notifications, though some programs, such as Winamp, use it for minimized windows. The clock by default appears here, and applications can put icons in the notification area to indicate the status of an operation or to notify the user about an event. For example, an application might put a printer icon in the status area to show that a print job is under way, or a display driver application may provide quick access to various screen resolutions. In Windows XP, the user can choose to permanently display or hide some icons, or hide them if inactive for some time. A button allows the user to reveal all the icons. Optionally, a clock can be displayed in the notification area. A class of utilities typically called taskbar clock replacements can replace the Windows XP taskbar clock with a clock with more features.


| |

Customizing the Start Button Text of the Windows XP

Most computer users who have long been utilizing the Windows XP Home and Professional operating system suite versions are so sick and tired of that green conventional button on the bottom left-most portion of their desktop. The perpetual "Start" has been on this button since time immemorial or since Microsoft released the first of the Windows operating system suite version.

This is why most intermediate to highly skilled Windows XP users are tweaking the system registry so as to fully customize the look and feel of the Windows XP desktop that they have on their computers. Some people turn to the familiar faces for computer help, while other people turn to experts and technical support professionals for their computer issues. Among the concerns, the deemed most troubling thing to do is to actually change the unblinking and equally unchanging "Start."

Fortunately, there are steps you can take to impose a different kind of change in this area on your Windows desktop. But do take note of the fact that the computer help steps that follow below are applicable only to the Windows XP desktop, both Professional and Home versions, and not the prior and latest versions from the Windows Operating System suite.

These steps may not require professional computer help or technical support. The first thing you should undertake is to identify and determine a program, which could decompile and modify 32bit Windows EXE files. Such a program should also have the function to compile and save Windows executable files, which all have the .exe extension. This is because in order for you to change the information on the Windows XP Start button, you need to decompile and modify the explorer.exe file. It is in the C:\Windows folder that the executable file is located. Use the program to enhance the Start button of your computer. This is achieved by compiling and saving the changed explorer.exe file.

You can do a search on Google or any search engine for such a program. But if ever you have difficulty searching, one recommendation is to utilize The Resource Hacker™. This is one tool that provides functions and features to decompile and modify 32bit Windows EXE files. This application can also compile and save the functionally modified Windows executable files. This program is freeware, which means that you could freely download and subsequently use it without costs.

When you have downloaded this application, there isn't a need to install it on your computer system since it is a 32bit Windows application. But before you modify the explorer.exe file found in the C:\Windows folder, you should make a back-up and save the file in a different folder or disk partition.

Backing up the explorer.exe file can be done by copying and pasting the file on a different location. It can be pasted anywhere on your computer other than the C:\Windows folder. You should consider pasting it on an entirely different location from the system partition of Windows XP. Doing so would provide you the flexibility of reversing your computer system to its original Explorer default settings, if ever you do something harmful to both the file and the system registry.

Using the Resource Hacker™'s program, open the explorer.exe file located in the C:\Windows folder. Pressing the Tab key on your keyboard would put you in the actual right pane window of the application. Navigate to the String Table option by using the arrow keys. After doing so, expand the selection by again pressing the Tab key. Highlight the option string 37 within the String Table option, and press the right key so as to expand it again. Navigate to the 1033 option or to the 38 option, in case you are actually using the functional Classic desktop layout instead of the Windows XP desktop layout.

After doing so, press the Tab key again; this would take you to the right window pane of the program. This contains the scripts and codes of the String Table 1033 or 38 of the explorer.exe file. Item number 578 contains the quoted text Start, which is what you are looking for. Carefully leaving out the quotes, delete the boring word Start. Then, type in the word of your choice, but ensure that it is inside the quotes you have left out.

Now press the Tab key repeatedly until it takes you to the Compile Script button. Press the Enter key that you'll find in it. After you have compiled the functionally modified explorer.exe file, navigate to the File menu of the program and choose Save as option. Save it with another filename different from the explorer.exe, but use the .exe extension for the tweaked file. Save it in the C:\Windows folder of your computer.

You should then modify the system registry of your Windows XP Operating System. Press the keystroke Windows key plus R, and type in "regedit" in the edit box supplied by the Run Command window. This would take you to a dialogue box with functions and features in editing the system registry.

Navigate to the HKEY_LOCAL_MACHINE\SOFTWARE\Microsoft\Windows NT\CurrentVersion\Winlogon item, and carefully go through options one after the other. Navigate to the Shell option, and right click on it so as for a menu box to appear. Select the Edit String menu item on the dialogue box. This would take you to a new area in the window where the string values and other codes are to be found.

In the text field entitled "Value data:", key in the filename of the functionally modified explorer.exe you have saved in the C:\Windows folder. Press the Tab key repeatedly until it takes you to the OK button of the window. Press the Enter key on it.

You have now successfully modified the explorer.exe file, as well as the system registry of your Windows XP operating system. The latter computer help procedure is important since the operating system needs to keep track and adjust to the changes made to the registry. Afterwards, the desktop will now contain and display the new word you have keyed in on the modified explorer.exe file, but only after you have restarted your computer.


| |

Caps Lock by accident

caps lock

How many times you typed long text in MSWord and after you noticed "Caps Lock" were turned on? All you typed were case letters and you have to type again. You can change case with Shift + F3, too, but you have to make further effort and you will get nervous, that's almost shore.

Here's a tip how you can avoid that. You can attach sound to Caps Lock key and you'll here it when you turn it on by an mistake. Here's how you can do that trick:
Go to Start - Settings - Control Panel. Now go to Accessibility Options. Meny "Accessibility Properties" will open. There, chose "Use Toggle Keys" in "Toggle Keys" (in lower meny, click OK and that's it.


| |

Gmail and Outlook Express

email

If you have an Gmail account you have almost 3 gigabytes space on their servers and some people use that space as storage for their messages. But you can also have access to Gmail through Outlook Express, too if you like. In that case you can write mails and answers using Outlook Express advantages. You can use Stationery and other possibilities.
To start with that, you have to do following:

- Open Outlook Express and go to Tools – Accounts
- Click on Add – Mail
- Type your name and click Next
- Type your Gmail address and go Next
- In «Incoming mail (POP3, IMAP or HTTP) server», type pop.gmail.com
- In «Outgoing mail (SMTP) server», Type smtp.gmail.com
- Click Next
- Write your full gmail address in Password
- Go Next and than Finish
- Pick up pop.gmail.com account you just made
- On Servers card, click Properties
- Under «Outgoing Mail Server» check My server requires authentication.
- Go to Advanced
- Check «This server requires a secure connection» (SSL) under «Outgoing mail (SMTP)» and under «Incoming mail (POP3)»
- On Outgoing server (SMTP) type 465. If number under Incoming server (POP3) didn't automatically changed to 995, type 995.
- Click OK and than Close.


| |

Cobra Security 2010 Complete Edition [Build 2]


Cobra Security 2010 Complete Edition


Cobra Security 2010 Complete Edition [Build 2]


Best freeware security solution for your computer. Main components are Prevx CSI, McAfee & SpywareBlaster. Other components like F-Secure, NOD32, Trend Micro and others, these are stand alone virus scanners. Some components are Online Virus Scanners and you can add these components every time from our website. Thanks to these Components is Cobra Security 2010 very useful and safe for every computers. Also you can Install Cobra Security to USB Device and later you can use it anywhere where you want. Cobra Security 2010 Anti-Virus component scan your entire computer in 2 minutes.


Cobra Security 2010 includes:

avast! Virus Cleaner\
Avira AntiVir Virus Remover\
CWShredder\
Dr.Web CureIt!\
F-Secure Easy Virus Cleaner\
McAfee Avert Stinger\
McAfee SiteAdvisor\
Multi Virus Cleaner\
NOD32 On Demand Scanner\
Prevx CSI\
Sophos Anti-Rootkit\
SpywareBlaster\

Features:

Anti-Virus (Real-Time Protection)
Anti-Virus: Detects Viruses, trojans, spyware, dialers, adware & other
Web Protection (Real-Time Protection)
Anti-Spyware (Real-Time Protection)
Anti-Spyware: Detects Spyware & Adware
Firewall (Real-Time Protection) NEW!
Firewall: Detects hackers & malicious programs
System Protection NEW!
System Protection: System, file & data protection
Anti-Spam (Real-Time Protection)
Anti-Spam: Email Protection
Multi-Engine Virus Removal Tools
Online Backup
PC Optimizer
File Recover
Strong Encryption
Don´t slow down your system
Use it anywhere (Any Computer, USB, CD/DVD or any other device)
Anti-Virus - Automatic database updates
Can update Cobra Security components separately
Clean Install
Free of charge

Extra added:

Added new Virus Scanner NEW!
Added PC Diagnostic Tool NEW!
Added 2 Web Browsers NEW!

Babylon Portable

Babylon Portable
Download:
http://rapidshare.com/files/241863157/Cobra_2010b2.www.whereweget.com.rar


| |

Compression tools AIO 35 in One


Compression tools AIO 35 in One


Compression tools AIO 35 in One


This package contains the best compression tools till now:
CCZIP V5.1
EXPRESS ZIP
ALZIP V6.62
AETSPLITZ V4.0.1
IZARC V3.81BUILD1550
KGB ARCHIVER V1.2.23
PORTABLE KGB ARCHIVER
WINUHA V2.0
WINZIP SELF-EXTRACTOR V3.1.7556
POWER ARCHIVER2007 V10.20.17
ZIPGENIUS V6.3.1140
POWERZIP V7.0.6
ZIP IT FAST PRO V3.0
ZIPZAG V1.80
SUPER ZIP3.0
TURBO ZIP V6.0
PICO ZIP V4.01
WINRAR V3.71
PORTABLE RAR RECOVERY TOOLBOX V1.1.4.7
DISKINTERNALS ZIP REPAIR V1.0
ADVANCED RAR REPAIR V1.0
ADVANCED ZIP REPAIR V1.7
ZIP REPAIR PRO V2.1.0.30
SFV CHECKER V1.17
WINRK V 3.03
VISUAL ZIP PASSWORD RECOVERY V6.0
ULTIMATE ZIP CRACKER V7.3.1.5
WINRAR PASSWORD BREAKER
ZIP PASSWORD RECOVERY
ZIP PASSWORD FINDER V1.0
RAR KEY V7.0.1180
ARCHIVE IDENTIFIER V0.06
SH ARCHIVE IDENTIFIER V 2.70
EXPRESSOR V1.4.5.1
ZIP SCAN V2.2D ...

Enjoy Agroni112

Babylon Portable

Babylon Portable
Download:
http://rapidshare.com/files/239254173/Compression_Tools_AIO.www.whereweget.com.rar


Labels

Blog Archive